Swift Continue a Line on Next Line
SwiftUI Text will take as many lines as possible to render its content by default. If you want, you can limit the number of lines with .lineLimit(_:) modifier, but we have no way to set minimum lines.
If you have a layout that needs to be present at an equal height, this might be a problem.
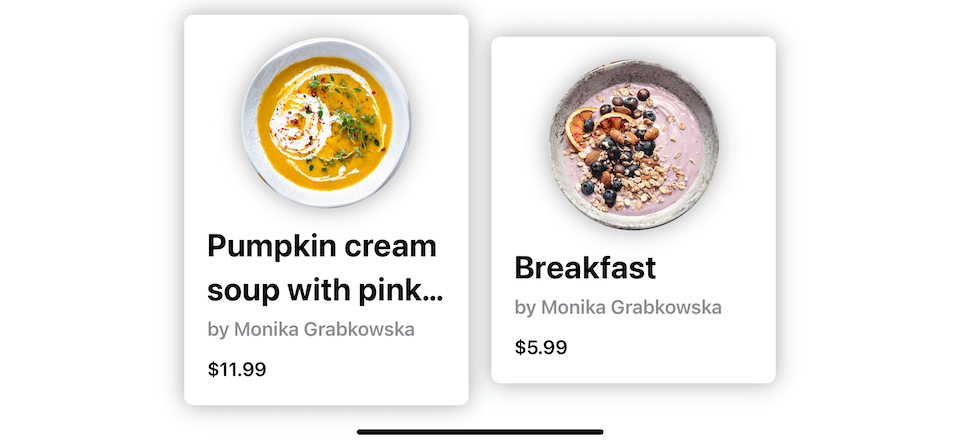
Consider this product card view with a varied name length. If you want to present them side by side in a grid, you might want them to have the same height.
Today, I'm going to show you a quick and dirty hack to set a minimum text line for a text view. [1]

CI/CD for iOS and macOS developers. Fast builds on M1 machines and predictable pricing. Automatic code signing and publishing with really good documentation.
Sponsor sarunw.com and reach thousands of iOS developers.
How to set a minimum number of lines to a text view
To force a minimum number of lines to a text view, you append a new line character (\n) to your text.
Here is my ProductCard view.
struct ProductCard : View {
let imageName: String
let name: String
let chef: String
let price: String
var body: some View {
VStack {
Image (imageName)
. resizable ( )
. scaledToFill ( )
. frame (width: 150 , height: 150 )
. clipShape ( Circle ( ) )
. shadow (radius: 10 )
VStack (alignment: .leading, spacing: 4 ) {
Text (name)
. lineLimit ( 2 )
. font ( .title. bold ( ) )
Text ( "by \( chef ) " )
. bold ( )
. foregroundColor ( .gray)
HStack {
Text ( "$ \( price ) " )
. font ( .headline. bold ( ) )
. padding ( .top, 8 )
}
} . frame (maxWidth: .infinity, alignment: .leading)
}
. padding ( 20 )
. frame (width: 250 )
. background ( )
. cornerRadius ( 8 )
. shadow (radius: 10 )
}
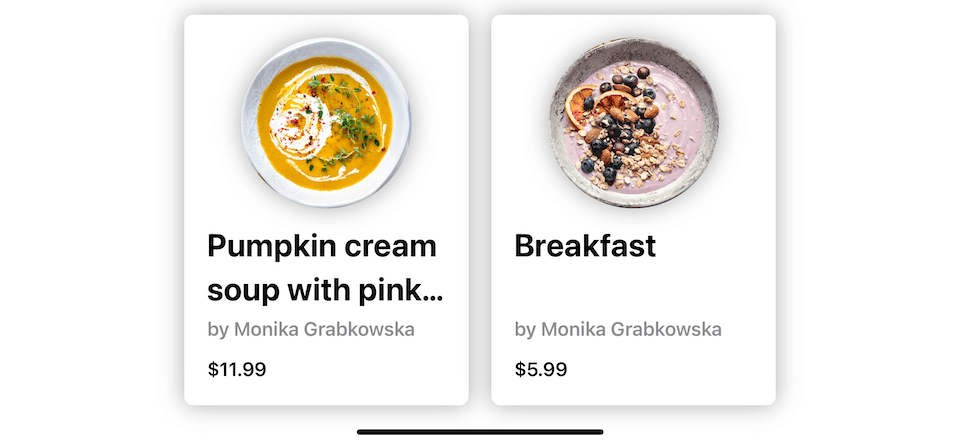
} To force product name to always render as two lines, I modify Text(name) to Text(name + "\n").
                                    struct              ProductCard              :              View              {
                          let              imageName:              String
                          let              name:              String
                          let              chef:              String
                          let              price:              String

                          var              body:              some              View              {
                          VStack              {
                          Image              (imageName)
                          .              resizable              (              )
                          .              scaledToFill              (              )
                          .              frame              (width:              150              ,              height:              150              )
                          .              clipShape              (              Circle              (              )              )
                          .              shadow              (radius:              10              )

                          VStack              (alignment:              .leading,              spacing:              4              )              {
                          Text              (name              +                              "\n"                            )
                          .              lineLimit              (              2              )
                          .              font              (              .title.              bold              (              )              )
                          Text              (                              "by                                \(                chef                )                "                            )
                          .              bold              (              )
                          .              foregroundColor              (              .gray)
                          HStack              {
                          Text              (                              "$                \(                price                )                "                            )
                          .              font              (              .headline.              bold              (              )              )
                          .              padding              (              .top,              8              )
                          }
                          }              .              frame              (maxWidth:              .infinity,              alignment:              .leading)
                          }
                          .              padding              (              20              )
                          .              frame              (width:              250              )
                          .              background              (              )
                          .              cornerRadius              (              8              )
                          .              shadow              (radius:              10              )
                          }
                          }
As simple as that, my product card views are now rendered at the same height.
Solution
The solution can sum up as follows:
To force text to have minimum n lines, you append n-1 new line characters to your text.
And you should limit the number of lines to n with .lineLimit(_:).
                                    // Force 2 lines
                          Text              (name              +                              "\n"                            )
                          .              lineLimit              (              2              )
                          // Force 3 lines
                          Text              (name              +                              "\n\n"                            )
                          .              lineLimit              (              3              )
Caveat
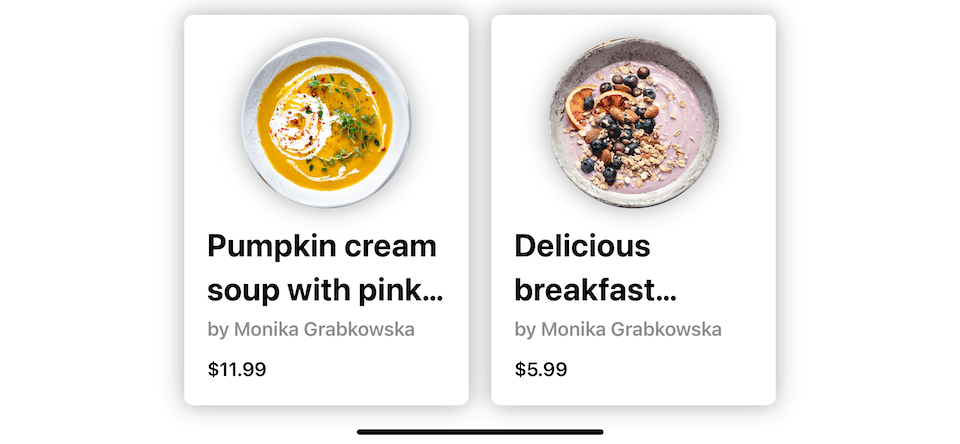
Since this is quite a hack, you can expect a drawback. If your product name takes two lines, it will render in truncated form (showing ellipsis).
                                    ProductCard              (
                          imageName:                              "soup2"                            ,
                          name:                              "Delicious breakfast"                            ,
                          chef:                              "Monika Grabkowska"                            ,
                          price:                              "5.99"                            )
Typically, "Delicious breakfast" should fit perfectly without an ellipsis, but since we add an extra line with a newline character (\n), that makes a name become three lines and get truncated.
iOS 16
In iOS 16, SwiftUI got new variation of lineLimit modifier, lineLimit(_:reservesSpace:). This modifier does what we are trying to accomplish in this article.
What we need to do is remove our workaround ("\n") and repalce .lineLimit(2) with .lineLimit(2, reservesSpace: true).
                                    struct              ProductCard              :              View              {
                          let              imageName:              String
                          let              name:              String
                          let              chef:              String
                          let              price:              String

                          var              body:              some              View              {
                          VStack              {
                          Image              (imageName)
                          .              resizable              (              )
                          .              scaledToFill              (              )
                          .              frame              (width:              150              ,              height:              150              )
                          .              clipShape              (              Circle              (              )              )
                          .              shadow              (radius:              10              )

                          VStack              (alignment:              .leading,              spacing:              4              )              {
                          Text              (name)
                          .              lineLimit              (              2              ,              reservesSpace:              true              )
                          .              font              (              .title.              bold              (              )              )
                          Text              (                              "by                                \(                chef                )                "                            )
                          .              bold              (              )
                          .              foregroundColor              (              .gray)
                          HStack              {
                          Text              (                              "$                \(                price                )                "                            )
                          .              font              (              .headline.              bold              (              )              )
                          .              padding              (              .top,              8              )
                          }
                          }              .              frame              (maxWidth:              .infinity,              alignment:              .leading)
                          }
                          .              padding              (              20              )
                          .              frame              (width:              250              )
                          .              background              (              )
                          .              cornerRadius              (              8              )
                          .              shadow              (radius:              10              )
                          }
                          }
You can read more about lineLimit improvements here.
CI/CD for iOS and macOS developers. Fast builds on M1 machines and predictable pricing. Automatic code signing and publishing with really good documentation.
Sponsor sarunw.com and reach thousands of iOS developers.
Conclusion
This is a simple hack that I use many times when I want to force the same number of lines across various text size ranges. The pro of this hack is the speed, and the con isn't that bad either.
In a future article, I might come up with a more elegant solution. Stay tuned.
-
Beautiful soup and breakfast photos by Monika Grabkowska on Unsplash. ↩︎
Feel free to follow me on Twitter and ask your questions related to this post. Thanks for reading and see you next time.
If you enjoy my writing, please check out my Patreon https://www.patreon.com/sarunw and become my supporter. Sharing the article is also greatly appreciated.
Source: https://sarunw.com/posts/how-to-force-two-lines-of-text-in-swiftui/
0 Response to "Swift Continue a Line on Next Line"
Post a Comment